Billing setup
Configure billing global settings, tax rates, automatic disconnects, transaction types, credit card and EFT processing, customer statements, and service plans.
Global Settings
There are certain settings that apply across the entirety of the Swift Fox billing system, and that are difficult to change once they have been put into place. These set the date at which customers will be billed, as well as how far in advance they receive their statement and how much time after their billing date the statement is due. Based on these settings, things like automatic disconnections, A/R aging reports, and all sorts of other billing features will be determined.
- Under Billing → Settings, take a look at the Global Settings tab of the Billing Setup box.
- By default, customers will have their billing date set to the 1st of the following month, and have a pro-rated charge added upon install for the remainder of the month until this point. Most ISPs find this is a simple and easy-to-understand mechanism, but you can also set any other day of the month, or have billing based upon the date of install.
- If you change any of the settings in here, you can see how an example billing run would work by changing the date in the “Let’s say a customer is installed on ______” box. Make sure to confirm that this matches your expectations for the settings you have chosen.
- For now, you can leave all of the Automated Tasks off. But once you are ready for billing to go live, you will want to turn all of these on.
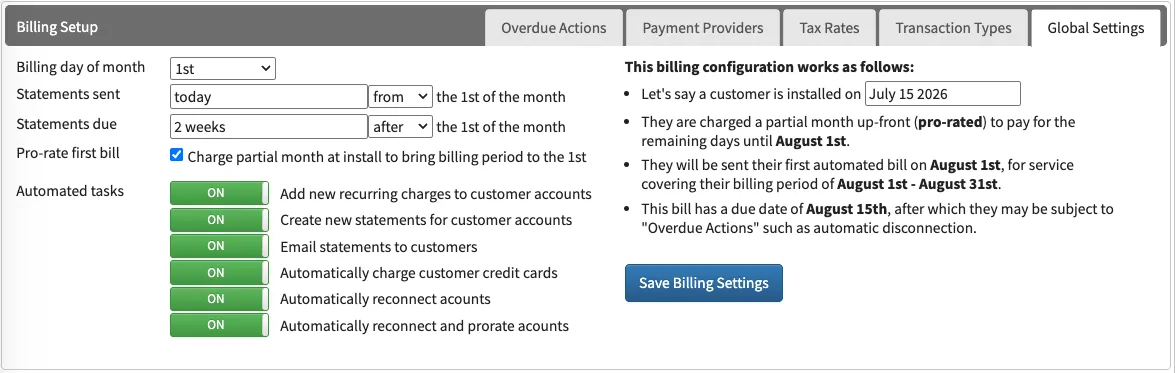
The Global Settings tab, with a worked example of how the configuration bills a new customer.
Tax Rate Config
Before adding any packages, you’ll want to set up your local tax rates. Taxes are set on a per-package basis, or selected when adding manual entries to customer billing registers.
- Under Billing → Settings, click the “Tax Rates” tab in the Billing Setup box.
- Click “Add Tax Rate”
- Enter a description and a short name for the tax. The short name is usually the acronym that would appear beside the tax amount on a statement
- For a simple tax, just enter the code and description again below, the tax percentage, and click “Add Tax Line”. Then click the checkmark next to the tax you just added.
- For more complex taxes, where there are two or more components (such as provincial and federal tax), add a tax line for each tax and make sure that they are checked off
- If you are in a jurisdiction that has taxes applied on top of another tax, make sure to select the tax that is being taxed in the appropriate dropdown.
- Click the Save button when you are done
- If you want this tax to be the default selection for all new packages and charges, be sure to click the radio button to the left of your new tax
Set up Auto-Disconnect
To help make billing easier, Swift Fox supports automatically disconnecting customers for non-payment. If the core router is configured properly (instructions in the “Pingbox and network setup” section), then customers will receive a screen telling them there is a problem with their account, and to log in to pay their bill online.
- Under Billing → Settings, click the “Overdue Actions” tab in the Billing Setup box.
- Look at the default settings and see if these will work for you. Feel free to delete them and add new ones to suit your business policies.
- Days overdue is calculated based on the due date of the statement (from Global Settings), and the “Min Owing” is the minimum threshold to activate the automatic action.
- If you would like to automatically reconnect customers, then make sure that you set them up in here to be changed into a status that supports this. For most ISPs, you’ll have an “Overdue” status, which you should ensure is configured to allow auto-reconnects. Status configuration is done under Clients → Settings, and is covered in Client setup.
Transaction Types
Swift Fox handles reporting and categorization for all Internet revenue that is billed through the system. It is your responsibility to reconcile this information with your bookkeeping software, so we have built in a lot of flexibility on how the categories and reporting work. To change this:
- Under Billing → Settings, click the “Transaction Types” tab in the Billing Setup box.
- The dropdown will choose the type of categories that are available. This includes:
- Deposit Types - These should be the types of accounts that your payments will be deposited into. For most ISPs you will want one for “Chequing Account” and maybe one for “PayPal”. This is important when it comes to reconciling your deposits against your bank statements, so there should be one of these for each type of account you have that gets bank statements
- Transaction Categories - This is optional, and is only necessary if you’d like to organize your revenue into things like “Business” or “Residential”. If you are alright with all of your revenue being sorted into one general category in your bookkeeping, then you can leave this empty. This category is applied on top of other categories in sub-types. So for example you can have a “Residential” category on top of an “Internet Service” service subtype. How you choose to apply this is based on your own reporting requirements.
- One-Time Items - This is a handy place to store things that get used frequently but aren’t recurring packages. Some examples might be an install fee, or a referral discount, or anything that you’ll want your techs to be able to easily apply without having to look up the price each time and manually typing it out
- The rest of the transaction types are what will be called “sub-types” in the system. Feel free to look through them and change as you see fit, these all break down things like Payments into the individual types, or Services into the type of service (Internet vs. Television etc.)
- To add a new type, click the blue Add button, and if it is available, you can set the default by clicking the “set default” link.
- Removing types will cause them to become hidden, but they can be seen by clicking the “Show Disabled” checkbox.
Credit Card and EFT Setup
To automatically charge customer credit cards or bank accounts, you’ll need to set up an account with a supported merchant provider. Swift Fox supports a number of different providers, and can often add new providers if necessary.
- Under Billing → Settings, click the “Payment Providers” tab in the Billing Setup box.
- Under the “None Configured” dropdown, select your merchant provider. If you do not have a merchant provider, we recommend IPPay, as they specialize in working with WISPs.
- Fill in the credentials that your merchant provider has given you and click Save
- This should now be set up. Try a test charge from a customer account and see if it goes through.
- Make sure that the “Automatically charge customer credit cards” option is selected on the Global Settings tab
Customer Statement
By default, Swift Fox creates a simple statement design that will be used for your customers’ monthly bills. You will want to double check that this meets your needs, especially the footer which includes payment instructions.
- Under Billing → Settings, click the “Statement Settings” tab in the Notifications box.
- By default, customer statements will be sent from your ISP short-code @myinternetbill.com - this is to allow us to manage mail server reputation in order for statements to not end up in spam folders. If this works for you, simply ensure that the “Forwards To” address is correct, and we will forward all replies to this address to you. If you’d like the emails to come directly from your domain, please contact Swift Fox and we will provide the correct DNS settings and verifications to set your domain up for this.
- Check over each section and make sure that it is accurate. You can edit things directly here, or if you want to include more advanced formatting, click the last icon on the toolbar to edit the HTML directly
- If you want to change the colours or layout, feel free to edit the CSS code to do this. You may need to enlist the help of a web designer if you’re not familiar with CSS.
- To see how the statement will look as the customer receives it in their email, click the “Sample Statement” link at the bottom
Setup Service Plans
Now that the rest of the billing system is ready to go, you can start adding service plans for customers. Swift Fox supports two types of service plans, “Internet” packages that require a CPE and network service, and “Generic” packages that are independent of this. If you have a large number of plan types to import, please contact Swift Fox and we can assist in this.
- Under Billing → Settings, click the “Add New Plan” button at the top of the page.
- Enter the plan name at the top. This will appear on the customer statement, as the first part of the charge.
- If the plan is attached to Internet Service, then make sure the “Requires CPE” checkbox is left checked. If it is unrelated (eg. email, web hosting, television, etc.) then uncheck this box.
- Set the period of the plan. Be aware that for any period greater than Monthly, that bandwidth overages will still be charged on a monthly basis if enabled.
- Add the details to the recurring entry. This is what will be applied to the customer account automatically each billing period. You’ll want to use the “service” type for things that are period-based, like Internet Service, and the “charge” type for things that are incidental. For packages, you’ll usually only have “service” entries and maybe “discount”.
- For packages that include Internet Service:
- Package Queues - sets the speed that the customer will be shaped to. This affects all of the devices behind the customer radio, and is automatically done with a queue rule per customer in the Mikrotik core router, Pathbox, or third party API.
- Monthly Bandwidth Caps - sets whether the customer radio has a limited amount of bandwidth each month. You can choose to either disconnect the customer, reduce their speed, or just send them warning emails when they approach and reach the limit.
- Daily Bandwidth Caps - this is similar to the monthly caps, but on a daily basis, and will only disconnect the customer until midnight once they reach it
- Monthly Overage Fees - will automatically apply an extra fee for bandwidth overage if it is exceeded in a month.
- If you need to disable a package, but it is already set up on customer accounts, click the “Deprecated” check box to prevent it from being added to any new customers. Once it has been removed from all customer accounts, you can uncheck the “Enabled” checkbox and it will disappear from the settings page
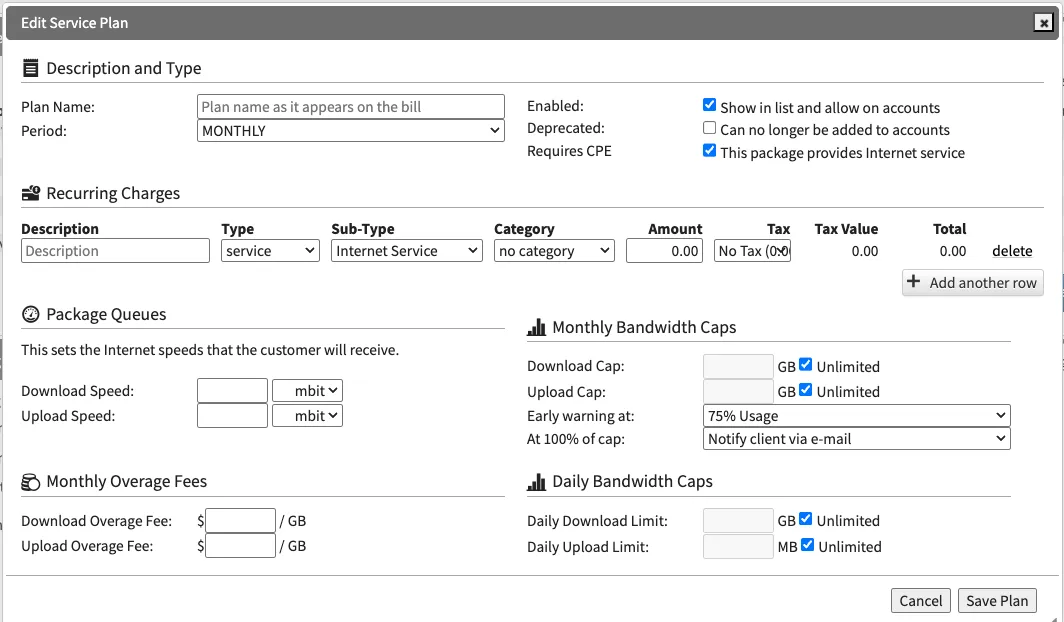
Creating an Internet service plan: speeds, caps, overage fees, and recurring charges.