Traffic shaping and MPLS balancing
Turn on per-customer traffic accounting, enable out-of-band TCP latency monitoring, and set up automatic MPLS/TE traffic balancing across your backhauls.
Configure Traffic Accounting
For each edge router, Swift Fox needs to collect traffic accounting information for your customers in order to monitor their bandwidth and to enable features such as DDoS mitigation and MPLS/TE auto balancing. We support either Mikrotik IP Accounting or NetFlow for this — only one or the other needs to be enabled and used at the same time.
Set up IP Accounting
For ISPs with fewer than 500 subscribers, IP Accounting is usually the simplest way to get bandwidth data for your customers, by having the Mikrotik router keep statistics on traffic that passes through it. Here are the steps to set that up and allow the pingbox to access this information:
- Log into your core router
- Under IP → Accounting, click “Enable Accounting”. Leave “Account Local Traffic” unchecked.
- Set the Threshold to 200000 and click Apply
- Click “Web Access”, and check “Accessible via Web”
- In the Address box, enter the IP address of the pingbox. You can look this up on the Network Map — as long as the pingbox is plugged in and active it will set the correct IP on the pingbox device. Click apply.
Set up Netflow
For larger ISPs, or ISPs that are not using Mikrotik routers — Netflow is the preferred way to collect traffic accounting data for your customers. You will want to make sure that the pingbox is located near the core router as this will generate a large volume of small UDP packets and dropping them will skew your data. You only need to set up one or the other for Netflow or IP Accounting, not both.
- Log into your core router and go to IP → Traffic Flow
- Ensure the Enabled checkbox is checked
- Select the interface(s) for your upstream provider
- Set Cache Entries to 1M
- Set the Active and Inactive Flow Timeouts to 00:00:05. Some older firmware versions may not be able to set lower than 00:00:60.
- Click the Targets button, and click the Add (plus) button
- Set the Src Address to an IP on your core router that is on the same subnet/interface as the pingbox tunnel, and set the Dst Address to the IP of the pingbox, the port to 2055, and the version to 5
- Click OK on the targets window and OK on the traffic flow window
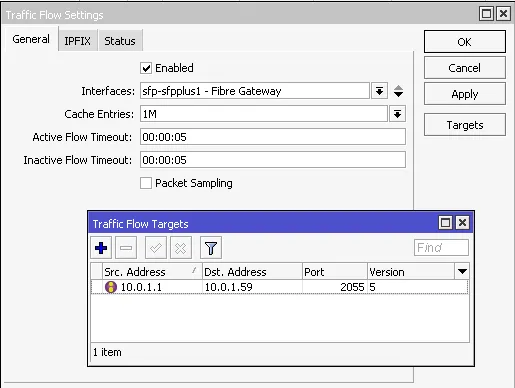
Traffic Flow settings with the target pointed at the pingbox.
Enable TCP Latency Monitoring
Swift Fox supports measuring the passive TCP latency of each customer connection in order to gauge the performance of customer devices beyond their radio and beyond the NAT of their router. To do this, it needs to take a sample of TCP ACK packets in realtime from your edge router and forward them to the pingbox for timing analysis. This should only be done in cases where the pingbox is directly plugged into the edge router (or on the same switch) as it will require a high packet per second rate and is sensitive to latency fluctuations.
Adding the firewall rule
To enable this, Swift Fox uses a TZSP mangle rule in Mikrotik to copy only the necessary packets for measurement. This is a single rule and can be enabled or disabled at any time. To set it up, paste in the following to the Mikrotik terminal — but change the sniff-target IP to your pingbox IP if it is not the cloud pingbox default:
/ip firewall mangle add action=sniff-tzsp chain=forward dst-limit=0/20s,2,src-and-dst-addresses/250ms packet-size=40-200 \
    protocol=tcp sniff-target=10.172.0.1 comment="Swift Fox TCP Latency Monitoring"\
    sniff-target-port=37008 tcp-flags=ack
Set up MPLS/TE Traffic Balancing
As Swift Fox has a thorough and up-to-date knowledge of your network backhaul capacities, it can be configured to steer downstream traffic across your network in a more balanced way than OSPF could alone. This traffic balancing can also automatically reroute traffic across links that are experiencing bottlenecks, and split traffic evenly across backhauls with varying capacities.
Prerequisites
- A Mikrotik v6 or v7* router near your gateway edge that downstream customer traffic will flow through
- Netflow enabled on this router
- OSPF running throughout the network, with Traffic Engineering enabled
- MPLS enabled on each router (LDP is not necessary)
- Traffic Engineering enabled on each backhaul interface
- MTU set up to accommodate MPLS if you don’t want to clamp TCP MSS
* Mikrotik v7 edge routers are only compatible with ARM64 architecture (eg. CCR2116, CCR2004, RB5009), and must have container mode enabled. Mikrotik v7 site routers are compatible with any architecture. Mikrotik v6 site or edge routers are all compatible.
Preparing your network for MPLS/TE
This assumes that you already have OSPF deployed, and that each of your network site routers has a loopback address configured. If you are already using MPLS with Traffic Engineering, then you may be able to skip this section as this work should already be done.
Mikrotik v6 Site Routers:
- In “Routing → OSPF → Instances”, select your instance
- Make sure the router ID is correct (and is assigned as a loopback /32 IP)
- In the “MPLS” tab, set the TE Area to your OSPF network name (eg. backbone)
- Also in the “MPLS” tab, set your MPLS TE Router ID to be your loopback interface
- In “MPLS → Traffic Eng → Interface”, add a new interface for every
backhaul on this router
- Pick an interface from the dropdown that corresponds to a backhaul. This should be the same interface OSPF uses
- Set the bandwidth to something arbitrary, like “100M”. Swift Fox doesn’t use this, but it is required to enable the interface
- Leave everything else in here as default
Mikrotik v7 Site Routers:
- In “Routing → OSPF → Instances”, select your instance
- Set the “MPLS TE Address” to be the router id (loopback ip) for this router
- Set the “MPLS TE Area” to the same as your OSPF area (probably 0.0.0.0)
- In “MPLS → MPLS → LDP Instance”, create a new instance if you do not have
one
- Set the “LSR ID” to be your router id loopback IP
- Leave everything else blank, we don’t need to actually enable LDP, just set the LSR ID
- In “MPLS → Traffic Eng → Interface”, add a new interface for every
backhaul on this router
- Pick an interface from the dropdown that corresponds to a backhaul. This should be the same interface OSPF uses
- Set the bandwidth to something arbitrary, like “100M”. Swift Fox doesn’t use this, but it is required to enable the interface
- Leave everything else in here as default
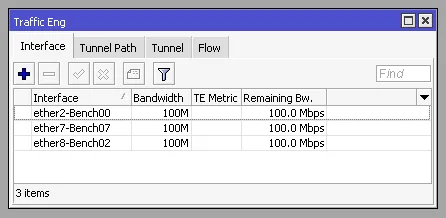
Adding Traffic Eng interfaces for backhauls in Winbox.
Configuring your edge/gateway router(s) for MPLS/TE
All of the automation and syncing that Swift Fox will be applying for rerouting your customer traffic into MPLS/TE tunnels will be happening at your edge router (close to your network gateway). Only downstream traffic can be steered, upstream customer traffic will follow OSPF same as before. Multiple gateway routers are supported, but care should be taken not to configure this in a way that downstream customer traffic does not pass through more than one router that is being used to steer traffic this way (eg. a router at each redundant gateway in disparate locations is fine, but it should not be enabled for both a BGP router and an aggregation router that gateways to it). If you have any questions about supported network topologies, feel free to reach out to Swift Fox Support.
Mikrotik v6 Edge Routers:
- Configure the same as site routers above
- Make sure netflow is enabled (check the traffic accounting section above for instructions)
- There is no additional config required here, as V6 natively supports routing to TE tunnels, and Swift Fox can directly automate this. Skip directly to the “Enabling MPLS/TE Balancing in Swift Fox” section.
Mikrotik v7 Edge Routers:
- In version 7, Mikrotik removed the ability to route directly to TE tunnels — so in order to allow the same functionality, we need to do this within a lightweight container instead. This requires enabling “container mode”, which is a more complex config
- Setting this up will require two or three router reboots, and you will either need to be onsite at the router, or you will need to have a way of ungracefully powering it off (eg. a remote power control box). This may require scheduling an after-hours outage window.
- During your outage window, enable container mode:
- Open a terminal console and type:
/system device-mode update container=yes - This will start a countdown timer, and during this you will need to either push a button on the router (if it has one), or yank the power from the router ungracefully. If you have a remote power manager that cycles the power to the router, this can also be used.
- Once the router has booted back up again, confirm that container mode is
correctly enabled by running the following terminal command and ensuring
it says “yes” next to container:
/system device-mode print
- Open a terminal console and type:
- This is a good time to make sure that your router is on the latest version,
as early v7 versions have some bugs that directly impact the performance of
containers.
- Go to “System → Packages → Check For Updates”
- If there is an update, click the “Download and Install” button
- The router will reboot again, confirm it is on the latest version once it comes back up
- Now we’ll want to install the container package itself:
- Make note of your Mikrotik version (it will be in the winbox window header)
- Go to the downloads section of the Mikrotik website, scroll to “RouterOS” and select “ARM64”
- Select your channel if necessary (eg. Stable), and then select your exact version from the dropdown
- In the “Extra Packages” section, click “Container” and it should download an NPK file
- Back in your router, go to the “Files” menu and either drag the NPK you downloaded into it, or click the “Upload” button and select it there
- Once uploaded, go to “System → Reboot” and let the router restart
- When it comes back up, confirm that you now see a “Container” menu available. This means the container subsystem is set up correctly
- With container enabled, we can now configure the router to support handling
MPLS/TE traffic.
- Go to “Interfaces”, click the + button, and select “VETH” to create a new
VETH interface
- Name it “veth-swiftfox”
- Set the “Address” to be a backhaul IP typical for your network (eg. 10.2.100.2/30)
- Set the “Gateway” IP to be the gateway side of that same subnet (eg. 10.2.100.1)
- Go to “IP → Addresses”, and click the add button
- Pick the “veth-swiftfox” interface we just added
- Set the “Address” to be the gateway IP from the last step, with the correct subnet (eg 10.2.100.1/30)
- Go to “Routing → Tables”, and click the add button
- Set the name as “to-sfox-pathbox”
- Ensure “FIB” is checked
- In this step you’ll need to create an interface list that contains all
the upstream interfaces that your downstream customer traffic will come
into this router from. This will usually be either your upstream gateway
interfaces, or your BGP router if this is an aggregation router. You do
not want to include interfaces that point towards your customers. If you
already have an interface list for this (eg. for NAT or something), you
can skip this step, otherwise:
- Go to “Interfaces → Interface List”, and click the “Lists” button
- Click the + button and name the list something like “upstream-interfaces”. You can leave the other fields here blank
- Close the “interface lists” window, and in the “interface list” tab of the interfaces window, click the + button
- Select the list you just created, and then select one of the upstream interfaces
- Repeat the last step for every upstream interface you have.
- Go to “IP → Firewall → Mangle”, and create a new firewall rule
- Ensure it is on the “prerouting” chain
- For “In Interface List”, select the one you created in the last step
- Under “Action”, set the action to “mark routing”
- Set the “New Routing Mark” to “te-sfox-pathbox”
- Leave passthrough enabled
- Click “Disable”, as we won’t be ready for this yet, and say yes to commit changes
- Click OK and make sure this rule appears somewhat near the top of the other rules (depends on your specific config)
- Go to “IP → Routes”, and create a new route
- Set the Dst Address to 0.0.0.0/0
- Set the Gateway to be the IP address you configured in the veth in step 6.1.2
- Set the Routing Table to be “te-sfox-pathbox” (very important!)
- You can apply this route, it will only be used for traffic that hits the mangle rule we just set up, and that should be disabled for now
- Go to “Interfaces”, click the + button, and select “VETH” to create a new
VETH interface
- Configure MPLS/TE and OSPF for this router
- Make sure that the “veth-swiftfox” interface that we set up earlier is included in your OSPF network. How you do this will depend on your network config norms, either adding an interface template, including it within one, or catching it with an “all” rule. The result you’re looking for will be to have the veth interface show up as “passive” under the “Routing → OSPF → Interfaces” tab.
- Ensure that the same config as the “Mikrotik v7 Site Routers” above is set up for this router too, with all the backhaul interfaces enabled for Traffic Eng. You will also need to make sure that the “veth-swiftfox” interface is also enabled for Traffic Eng.
- Ensure netflow is set up on this router properly (see the “traffic accounting” section for more details)
- Add the Pathbox container
- Go to “Container → Envs”, and click the + button
- Set “List” to be “sfox-pathbox”
- Set “Key” to be “PROVISION_KEY”
- Set “Value” to be the provision key that you are given in the Swift Fox interface in the “Enabling MPLS/TE Balancing in Swift Fox” section below
- Add the container itself with the following command in the terminal:
/container add envlists=sfox-pathbox interface=veth-swiftfox name=sfox-pathbox \ remote-image=swiftfox/pathbox:latest root-dir=/sfox-pathbox start-on-boot=yes - In “Container → Container”, you should see it download and extract. Once it’s done, click it and click the “Start” button to start it.
- You can check “Container → Log” to make sure it starts correctly
- Go to “Container → Envs”, and click the + button
- When you’re ready, enable the firewall mangle rule that we set up in step 6.5 and this will send traffic into the container. By default, all traffic sent to it will be sent back out to this host router to be routed normally if it isn’t assigned to a tunnel yet.
Enabling MPLS/TE Balancing in Swift Fox
In order to enable auto traffic balancing in Swift Fox, just make sure your edge routers have netflow enabled (you can right-click them on the network map and select “Enable Netflow data collection”). If this is done, you’ll be able to manage the actual settings for auto balancing by clicking the “Routing Analysis” tab from the netmap, and then clicking the “Configure” button.
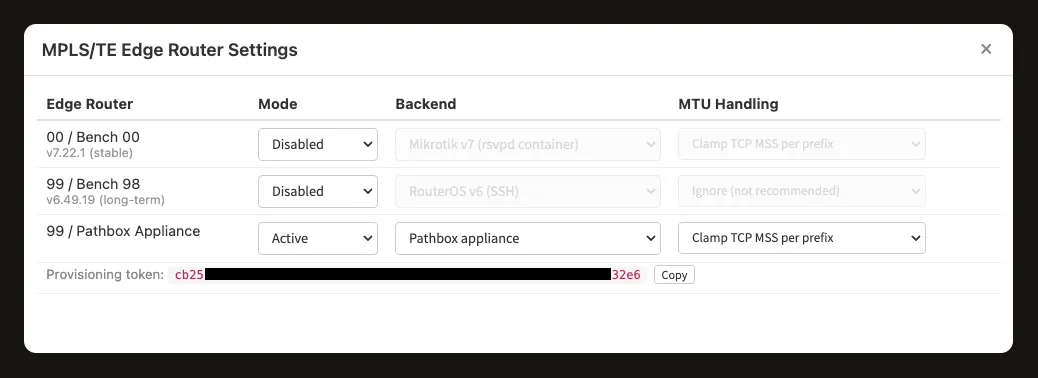
MPLS/TE edge router settings: per-router mode, backend, and MTU handling.
There are three modes available:
- Disabled — This routes traffic as it was before without MPLS/TE, and will remove any special routes or tunnel paths that were created if you did have it enabled.
- Monitor — This will watch the traffic flowing through the router, and advise on any network issues that might prevent MPLS/TE from working (like missing traffic eng interfaces on site routers, or MTU below threshold, missing netflow data, missing routers etc). This mode does not make any changes to the router or traffic flow, it’s observation-only. It is recommended to use this mode at first to rule out issues before setting things Active
- Active — This enables MPLS/TE and starts creating TE tunnels and routing customer traffic onto them.
There are also several ways of handling MTU:
- Skip Below Threshold — This is the default, and will skip routing traffic on backhauls that are below a specified MTU. By default it is set to use 1504, which is a standard ethernet frame payload plus a single MPLS label. This option is ideal if you want to ensure your network is configured with MTUs that will represent the least impact to customer traffic, and is generally recommended if possible.
- Clamp MSS by Prefix — If your network does not support higher MTUs, such as with outdated backhauls or with GRE tunnels traversing the Internet — or if you just don’t want to roll out higher MTUs network-wide before enabling auto balance, this is the best option. It will automatically insert TCP MSS clamping mangle rules into your router, specific to each subnet that will be traversing those paths. This means that only customers being routed on paths that include low-MTU links will have their TCP packets modified to accommodate that MTU.
- Clamp MSS to Minimum — This is basically the same as the clamp by prefix option, but instead of setting the MSS for each subnet dynamically as the routing changes, it just inserts a single rule and sets the MSS to the lowest MTU that was found network-wide. This is the option to choose if your entire network has the same effective MTU limitation (eg. a carrier-hotel hosted GRE aggregation router, or a network with default 1500 MTU throughout)
- Ignore — This balances traffic without any attention paid to MTU, and assumes you will handle this on your own elsewhere. If you choose this and do not handle MTU correctly, customers may encounter problems connecting to some servers.
If any MTU setting is selected besides “Ignore”, customer traffic will be fragmented to fit within the detected tunnel MTU (minus 4 bytes for the MPLS label header) at the tunnel ingress point.